Developing and printing film
Photo: A photographic darkroom is usually lit with dim green or red light to prevent damage to undeveloped film. Photo by Leah Stiles courtesy of US Navy.
A light-sensitive slice of plastic film with an image invisibly imprinted on it isn't much use to anyone. To turn it into a recognizable photo, you have to developthe film in a darkroom (usually lit with red or green light that doesn't affect the film). This involves dipping the film in a series of chemicals, which convert the latent image captured by the tiny silver halide crystals into a visible image formed of larger silver particles, and also makes that image permanent.
First, the film is dipped in an acidic solution called developer, which encourages more of the silver halide to convert to metallic silver and renders the latent image visible. To stop this process continuing indefinitely, and ruining the photo, the film then has to be dipped in an acidic solution called astop bath to neutralize the developer. Once that's done, the image is made permanent by dissolving any remaining silver halide using a chemical solution known as hypo (or fixer), before being rinsed clean in water and hung up to dry.
At this stage, the image, though visible, is still in a negative pattern, with light areas looking dark and vice versa. That's why developed pieces of film are called negatives. Once the film is developed, it's printed: broadly speaking, you shine a light through the negative so it casts a shadow onto photo-sensitive paper and turns the negative film into a recognizable photograph called a (positive) print. You can make any number of prints from a single negative, which is one of the great advantages of this slightly laborious, "positive-negative" photographic process. By adjusting the distance between the negative and the paper you're printing on, and using lenses, you can also enlarge or reduce the size of a an image. The piece of equipment you use to do this is called an enlarger.
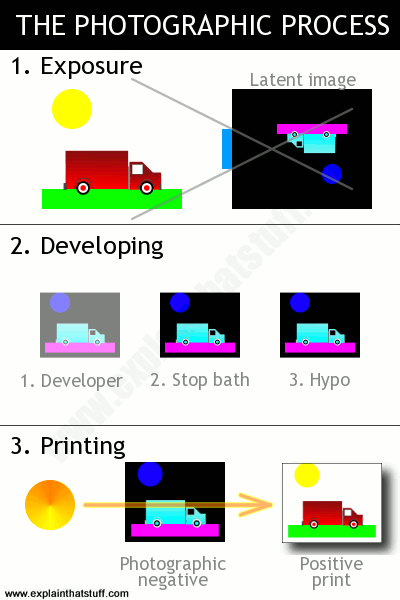
Artwork: The photographic process captures an image as a photograph in three main steps. 1: Exposure captures an inverted (upside down) latent (invisible) image on the film inside your camera. 2: Developing uses a series of chemicals to make the latent image visible and fix it permanently on the film in the form of a negative. 3: Printing produces a final photograph (a positive print) from the negative. You can make any number of prints from one negative.
It's possible to develop and print films yourself, but most photographic laboratories have large electronic machines that automate the process completely, threading the film through a series of tanks filled with chemicals in the correct sequence, at just the right speed. Those big photo-printing machines you still sometimes see in the back of drug stores typically use a method of developing color film called the C-41 process.
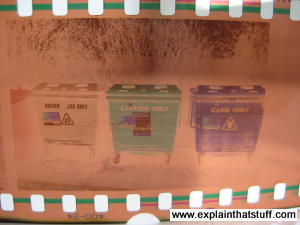
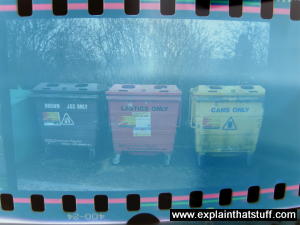
Photo: Left: A photographic color negative of some recycling dumpsters looks like this. Right: When it's printed, the colors are reversed and come out looking as you'd expect. I've simulated the effect of printing by reversing the colors digitally with acomputer graphics package. Notice how the real-life red dumpster (in the center in the positive image on the right) turns green in the negative, while the yellow one (on the right in the positive image) turns blue in the negative.
A light-sensitive slice of plastic film with an image invisibly imprinted on it isn't much use to anyone. To turn it into a recognizable photo, you have to developthe film in a darkroom (usually lit with red or green light that doesn't affect the film). This involves dipping the film in a series of chemicals, which convert the latent image captured by the tiny silver halide crystals into a visible image formed of larger silver particles, and also makes that image permanent.
First, the film is dipped in an acidic solution called developer, which encourages more of the silver halide to convert to metallic silver and renders the latent image visible. To stop this process continuing indefinitely, and ruining the photo, the film then has to be dipped in an acidic solution called astop bath to neutralize the developer. Once that's done, the image is made permanent by dissolving any remaining silver halide using a chemical solution known as hypo (or fixer), before being rinsed clean in water and hung up to dry.
At this stage, the image, though visible, is still in a negative pattern, with light areas looking dark and vice versa. That's why developed pieces of film are called negatives. Once the film is developed, it's printed: broadly speaking, you shine a light through the negative so it casts a shadow onto photo-sensitive paper and turns the negative film into a recognizable photograph called a (positive) print. You can make any number of prints from a single negative, which is one of the great advantages of this slightly laborious, "positive-negative" photographic process. By adjusting the distance between the negative and the paper you're printing on, and using lenses, you can also enlarge or reduce the size of a an image. The piece of equipment you use to do this is called an enlarger.
Artwork: The photographic process captures an image as a photograph in three main steps. 1: Exposure captures an inverted (upside down) latent (invisible) image on the film inside your camera. 2: Developing uses a series of chemicals to make the latent image visible and fix it permanently on the film in the form of a negative. 3: Printing produces a final photograph (a positive print) from the negative. You can make any number of prints from one negative.
It's possible to develop and print films yourself, but most photographic laboratories have large electronic machines that automate the process completely, threading the film through a series of tanks filled with chemicals in the correct sequence, at just the right speed. Those big photo-printing machines you still sometimes see in the back of drug stores typically use a method of developing color film called the C-41 process.
Photo: Left: A photographic color negative of some recycling dumpsters looks like this. Right: When it's printed, the colors are reversed and come out looking as you'd expect. I've simulated the effect of printing by reversing the colors digitally with acomputer graphics package. Notice how the real-life red dumpster (in the center in the positive image on the right) turns green in the negative, while the yellow one (on the right in the positive image) turns blue in the negative.